Why Your Samba Configuration Does Not Work
Bending the Samba/smbd configuration to enable file sharing between Linux-Linux or Linux-Windows desktop has always been a personal pain point of mine. Unsurprisingly few other topics on Linux desktop are being discussed so frequently among Linux desktop enthusiasts. Most users end up with a patchwork of smbd configuration options, leaving them with a dysfunctional and insecure system. This post intends to provide an overview of a basic smbd configuration that is compatible with Windows 10 systems.
The Goal
- A Samba SMB server that works well will Windows (and Linux clients)
- Understanding of why some configs do not work
- Password protected + passwordless/public shares
- Decent security configuration
TL;DR
- Modern systems (e.g. Windows 10) disable insecure SMB11 → SMB2 and SMB3 must be used
- SMB1 used NetBIOS host discovery → SMB3 + WS-Discovery must be used
- Use Netgear’s wsdd2 WS-Discovery daemon for host discovery
- Create users with
smbpasswdfor authenticated shares - Manage share permissions with UNIX + ACLs
- Use a
map to guest,guest okandguest onlyconfiguration for anonymous guest access - Windows logs in implicitly, leading to confusion
- The Gnome Virtual File System (GVfs/
gio) does not support WS-Discovery
Talk is cheap, show config! Here you go.
Table of Contents
Foreword
In no way I claim to have the {only,best} {working,secure,fastest} Samba configuration, but I do believe to have a decent one. Since a configuration on its own is pretty useless in the world of ever-updating software, I instead aim to explain the core concepts and challenges. Therefore the described configurations are kept to a minimum. This should put you in a position in which you can craft a useful configuration yourself.
Please also see the Windows Configuration section in order to prevent common pitfalls.
Host Discovery
The problem of getting a well-functioning SMB share starts with host discovery. It all boils down to one challenge: How does my computer know which other computers are in the network that provide SMB shares?
SMB’s first first version - SMB1 - made extensive use of the NetBIOS protocol family. A distinction must be made between the part of the NetBIOS that is responsible for discovering hosts in a local network (NetBIOS-NS) and the transport protocol (NetBIOS-DGM/SSN), which is used to transfer actual files. Therefore finding hosts in the network and transferring files are different tasks handled by different protocols:

SMB1 made use of the NetBIOS-NS protocol for host discovery.
As shown above, SMB1 strongly relies on NetBIOS-NS for host discovery. With the removal of SMB1 from Windows, other protocols have to be used for host discovery. Windows uses a multitude of different protocols to advertise hosts in local home networks:
- Simple Service Discovery Protocol (SSDP)
- Link-Local Multicast Name Resolution (LLMNR)
- Web Services Dynamic Discovery (WS-Discovery)
- …
In our case we will focus on WS-Discovery, since it is a fairly simple protocol2 with existing and maintained implementations. As the name might suggest, the protocol is based on Web-Services and uses SOAP-over-UDP. Netgear has implemented a fairly lightweight plug-and-play WS-Discovery daemon wsdd2, which advertises the current machine in the network. We can use this daemon to advertise our SMB server in our local network.
At the moment wsdd2 is not available (AUR) in the major Linux distributions, which means that you have to compile it yourself. But don’t worry, this one is very simple to compile and install since it does not have any notable dependencies:
sh@dsh ➜ /opt git clone https://github.com/Netgear/wsdd2.git
sh@dsh ➜ /opt ( cd wsdd2 && make && sudo make install )
After the installation we need to reload the systemd deamon to see the newly created wsdd2.service.
Finally we enable and start the service:
sh@dsh ➜ ~ sudo systemctl daemon-reload
sh@dsh ➜ ~ sudo systemctl enable wsdd2.service
sh@dsh ➜ ~ sudo systemctl start wsdd2.service
To check if the service is up and running:
sh@dsh ➜ ~ systemctl status wsdd2.service
● wsdd2.service - WSD/LLMNR Discovery/Name Service Daemon
   Loaded: loaded (/usr/lib/systemd/system/wsdd2.service; enabled; vendor preset: enabled)
   Active: active (running) since Thu 2021-10-14 20:53:30 CEST; 4s ago
 Main PID: 16255 (wsdd2)
    Tasks: 1 (limit: 4915)
   CGroup: /system.slice/wsdd2.service
           └─16255 /usr/sbin/wsdd2
Now, you should be able to see your host in the Windows Network tab (but you should not be able to access it). Congratulations, your computer now knows how to locate the SMB server in the network!
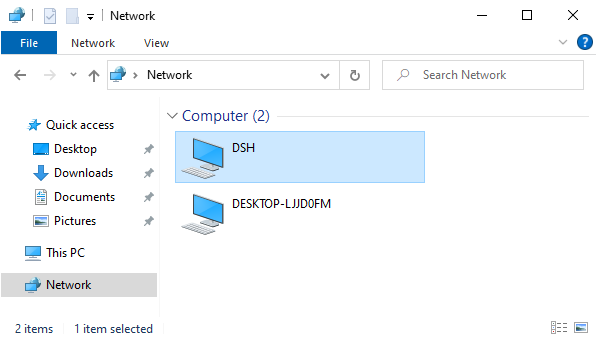
Our host with wsdd2 is showing up in the Network tab in Windows
As an alternative, you can also use the wsdd daemon, which is Python-based. In my experiments wsdd2 consumed less memory and was more responsive, YMMV.
Samba’s SMB Server
Now that our soon-to-be SMB server can be found in the network, we need to setup the actual SMB server. Several SMB implementations (many of the proprietary) exist on Linux, the most popular being Samba. This section will focus on configuring Samba exclusively.
An important clarification is that Samba can do more things than providing a SMB server. Although we only focus on the SMB configuration, don’t be surprised when you discover unrelated configuration options.
The first step is to install the Samba server package on your linux distribution (which I’ll not go into).
Right after installing make sure to stop the samba service, since we want to start it manually for debugging purposes.
Next, open the SMB configuration (sudoedit /etc/samba/smb.conf) and delete all the content.
The reason for most dysfunctional smbd configurations is the combinations of incompatible and outdated configuration options.
Do not override the default settings unless you have a reason to (no, copy pasting from a 2008 forum entry is not a valid reason 🔥).
For every setting you change, read the relevant section in the man pages (man smb.conf).
Not convinced? Read the map to guest (G) Bad Password note here.
Scenario 1: Password Protected Share
Let’s start out with the most simple configuration that allows us to share a directory, requiring users to authenticate with a username and password. But first we have to tell Samba that we wish to use the authentication model based on UNIX users (as opposed to LDAP/AD used in enterprise networks):
/etc/samba/smb.conf
[global]
# Handle access permissions via unix users. Unauthenticated clients
# can NOT query all available shares, therefore a valid `map to guest`
# parameter has to be set.
security = USER
As you can see, this configuration option is part of the global configuration, therefore it applies to all shares. Before we continue with the Samba configuration, let’s ensure that the directory we want to share has the right permissions.
With the USER security model Samba uses UNIX users and their permissions.
Validate that you can access the shares on the local filesystem with the respective user before debugging your Samba configuration.
I want to share read and write access to the existing directory /media/private with the user peter.
The user must be a valid UNIX user, so let’s create a simple user without any special rights (or you can just use your normal user):
sh@dsh ➜ ~ sudo useradd --no-create-home --shell /bin/false --system peterBefore doing anything with the Samba permission model, I created the permtest file inside the shared directory.
This allows us to check if the user possesses all the right permissions on the files.
Let’s use the namei utility to check if all parent directories have the execute bit set and the test program in combination with sudo -u peter to check if the user has read, write and execute permissions.
sh@dsh ➜ ~ namei --owners --modes /media/private
f: /media/private/permtest
 drwxr-xr-x root  root  /
 drwxr-xr-x root  root  media
 drwxr-xr-x peter peter private
 -rw-r--r-- peter peter permtest
sh@dsh ➜ ~ sudo -u peter test -r /media/private/permtest ; echo $?
0
sh@dsh ➜ ~ sudo -u peter test -w /media/private/permtest ; echo $?
0
sh@dsh ➜ ~ sudo -u peter test -x /media/private/permtest ; echo $?
1
Looks good, peter can successfully read and write the permtest file in the share, but not execute it.
We are almost done setting up the user, one vital part is missing.
With the USER security model it is necessary to create a Samba user with password for each UNIX user that shall be able to access non-public shares.
Now that the peter user exists and has all the permissions, Let’s register the user in Samba and assign a password.
Adding a new user can be done with the smbpasswd utility by providing the -a switch:
sh@dsh ➜ ~ sudo smbpasswd -a peter
New SMB password:
Retype new SMB password:
Added user peter.
Now on to the last step: Declaring which directory we want to share in the network. The configuration is very straightforward. For each share in the network a section indicator (square brackets) has to be created in the configuration file. All configuration options following the section indicator belong to this section.
/etc/samba/smb.conf
[private]
path = /media/private
read only = no
guest ok = no
Looks pretty simple, right?
This configuration for the share “private” gives read/write access to the directory and excludes guest access.
Let’s try it out and confirm it really works.
In order to see what our SMB server does, we manually start the smbd daemon in the foreground.
After the service has completed startup, I startup my Windows machine (name: DESKTOP-LJJD0FM, user: sh), navigate to the network tab and open the host the Samba service is running on.
We are immediately greeted with the error message “The user name or password is incorrect.":
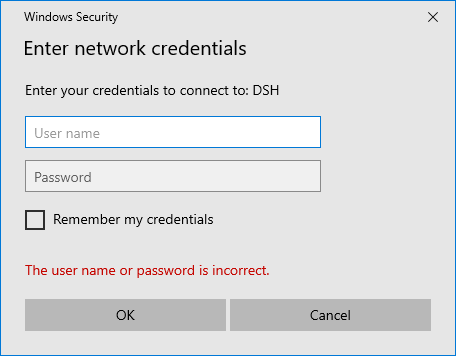
Windows is unable to login with default credentials.
But why is that? We did not provide any credentials and Windows did not ask us about any credentials! Let’s check the logs to find out what actually happened:
sh@dsh ➜ ~ sudo smbd --debuglevel=4 --foreground --debug-stdout
...
Requested protocol [NT LM 0.12]
Requested protocol [SMB 2.002]
Requested protocol [SMB 2.???]
setting sec ctx (0, 0) - sec_ctx_stack_ndx = 0
Selected protocol SMB2_FF
...
Got user=[sh] domain=[DESKTOP-LJJD0FM] ...
...
check_ntlm_password:  Authentication for user [sh] -> [sh] FAILED with error NT_STATUS_NO_SUCH_USER, authoritative=1
Auth: ... status [NT_STATUS_NO_SUCH_USER] ...
First there seems to be some kind of protocol negotiation in which the client and server agree on SMB2.
Some lines further down we see a login attempt with the username (sh) and device name of the windows machine (DESKTOP-LJJD0FM).
Aha! Windows apparently sneakily tries to authenticate against the SMB server without us noticing.
It seems to use the computer name and the current username to try and login.
Even further down in the log, we can see the result of this sneaky default authentication.
As expected the authentication fails because a user called sh cannot login into our SMB share since we only registered peter as a user using smbpasswd.
If no credentials are saved for a SMB host, Windows tries to log into the SMB share with the credentials of the current Windows user. This results in the “The user name or password is incorrect.” error message.
After entering the correct credentials for our previously-registered user peter, we are able to login and are able to access the private share.
There is one more problem tho: When we create new files in Windows, they have the execute bit set.
We can prevent this by excluding the execute bit in the create mask:
/etc/samba/smb.conf
[global]
# prevent files from getting a executable bit on creation
create mask = 660
That’s it! This is a pretty minimal configuration for sharing your files with authenticated users via SMB! We succeeded in setting up a private share using a minimal configuration with a total of 5 settings. I’d call that a success. If you encounter problems, please check the Windows Configuration section below.
Scenario 2: Public Guest Share
In our second scenario our goal is to create a SMB share in our local network that does not require any authentication and grants all users read and write access. This configuration supports the use-case of having multiple (trusted) users in your local network drop off some files on your computer. You might wonder why I dedicate a whole section to this scenario when it sounds to be a lot easier than setting up an authenticated share. There are several caveats you need to be aware of when setting up a public guest share, which I am going to describe in this section.
First of all we have to clarify the term guest.
For a Samba server (with security = USER) a guest is a UNIX user account that is used for unprivileged access to shares, if the permissions and settings allow it.
By default Samba uses the nobody UNIX user for the guest account (see man pages guest account (G)).
Confirm that the user exists, or explicitly use another UNIX user:
sh@dsh ➜ ~ grep nobody /etc/passwd
nobody:x:65534:65534:Nobody:/:/usr/bin/nologin
Neat, the default nobody user already exists for me, therefore people accessing the SMB share as a guest will be able to use the permissions of the nobody user.
As described in scenario 1, in order for users to be able to access files via the SMB share, the respective files must be accessible by the UNIX user that is used for the specific share by Samba.
In our case this means that we need to grant our guest user - nobody - access to the files that SMB guest user is allowed to access.
Now that we know which UNIX user will access our files when using a guest account, we can setup a new share that I will call public.
As the name might suggest, this share is supposed to be accessible by anyone for reading and writing without the requirement to authenticate.
But how does one login with the with this guest user? We did not give it a password, so logging in explicitly will not work. But remember, Windows tries to login automatically using the devices current user! So maybe we can redirect those login attempts to the guest user 🤔. That’s exactly what the following configuration option does:
/etc/samba/smb.conf
[global]
# Describes what happens when the requested UNIX user is not
# found. `Bad User` maps the user to the guest account if the username
# could not be found as a UNIX user.
map to guest = Bad User
If the user does not provide a valid UNIX user when logging into the Samba share, the user is automatically mapped to the guest user.
For example, the user peter is a UNIX user on our Samba server and has a samba password set.
peter can login normally using his username/password combination.
Another user tries to login with the username frank, but since this UNIX user does not exist, the user is logged in as the guest user (nobody).
This design decision certainly does not minimize surprises, but it is something to be aware about.
Do not use the option map to guest = Bad Password!
This will silently login users as guests when they fail to enter their password correctly.
The guest login is not apparent to the user and can cause confusion about access permissions.
Now that we enabled the guest mapping functionality, we can focus on creating the actual share. Just like with the authenticated share, we create a new section in the configuration file. The configuration is straightforward, just like with the previous configuration:
/etc/samba/smb.conf
[public]
path = /media/public
read only = no
guest ok = yes
The difference to the first scenario is that we allow the guest access via the parameter guest ok.
This means the guest user is allowed to access this share.
If the guest actually is allowed to read and write to the underlying directory depends on the file permissions for the nobody user.
Setting guest ok = yes on any share will allow anyone in the network to see which shares your Samba server offers.
This feature is called anonymous access.
You will see the log output “anonymous authentication for user [] succeeded” occasionally when a client enumerates your network shares.
Now we should be able to simply browse to the public share in our Windows network browser and create/read/modify files in it. It works!
If for the current Windows user’s account a Samba account exists (via smbpasswd), the automatic guest login will fail.
Windows will prompt for the password of the user’s account instead.
For more information see the caveats section.
Scenario 3: Mixing Private and Public
On their own the first and second scenario should work without further issues™. But let’s enable the public and private configuration at the same time and play around in both shares:
The authenticated user is not privileged to access the guest user's files.
It might be hard to see what’s going on in the video, I’ll walk you through it:
- I select the Samba host (
DSH) in the Windows explorer network browser - I am implicitly logged in as the guest user (
nobody) - I am provided access to the list of shares without logging in, since at least one share allows guest access (
guest ok = yes) - I am able to create the file
public.txtinside thepublicshare as thenobodyuser - I try to access the
privateshare, but get prompted for a login since guest access is not allowed for this share - I enter
petersSamba credentials: I am now authenticated as the userpeter - I create the file
private.txtinside theprivateshare as thepeteruser - I navigate back to the
publicshare and try to create new text file - The creation of the text file fails since
peterdoes not have the permissions to create a new file in thenobody-owned directory of thepublicshare
It is possible for an authenticated user to be unable to access a guest share’s files since the UNIX file permissions can be different.
Either ensure that the guest share is only allowed to be accessed by the guest user (guest only = yes or force user = nobody) or setup the necessary UNIX permissions (e.g. via ACLs).
In this example we will use the configuration option guest only to force logged in users to be mapped to the guest account when accessing the public share.
/etc/samba/smb.conf
[public]
guest only = yes
Now we can flawlessly switch between the private and public share.
Initially we are logged in as the guest user, but when accessing the private share for the first time, we are asked to provide credentials for changing our user to peter.
After being authenticated as peter, we are still able to access the public share, since the guest only options implicitly maps the peter UNIX user to nobody before doing any action on the filesystem.
Security and Misc Settings
/etc/samba/smb.conf
[public]
# only use SMB3.00+, most modern servers support this
server min protocol = SMB3_00

# only serve requests on specified interfaces
# interfaces = <see man pages>

# # enable ACLs
# vfs objects = acl_xattr
# map acl inherit = yes
# acl group control = yes
# store dos attributes = no
# force unknown acl user = no
# inherit acls = yes

# disable printing
load printers = no
printing = bsd
printcap name = /dev/null
disable spoolss = yes
User Mapping Caveats
Now onto a even less intuitive problem. As described in the second scenario, automatic guest login is not possible if a Samba user exists for the current user’s Windows username. But why is that exactly? Let’s take a look at the following three cases:

Three different cases of users logging into a SMB share.
In the first case we are looking at the happy path for authenticating a user.
In Windows, the user enters the username Adam with the matching password in the authentication prompt when accessing the SMB share.
By using the user map functionality, this username is mapped to the UNIX/Samba user adm, the credentials are verified and adm is granted access according to his UNIX file permissions.
So far so good.
In the second case there is no fancy using mapping going on.
But the user peter tries to login with a wrong password, which causes Samba to emit the NT_STATUS_WRONG_PASSWORD error message.
This happens when Windows automatically tries to authenticate with the default credentials with the SMB share.
The login is denied and the “wrong password” error message appears on the client side.
This can be especially confusing when setting up guest access, but you are prompted for a password.
Even when the password set via smbpasswd corresponds to the Windows password, the authentication might not work because NTLMv2 passwords are not allowed by default.
The third case shows what happens when a user tries to login when either no UNIX user exists for the given name, or no Samba password has been set for the UNIX user account.
In the default Samba configuration, this login attempt fails with the status NT_STATUS_NO_SUCH_USER and access is denied.
Hovever, when the map to guest parameter is configured, this failed login attempt is mapped to the guest user and the user is able to access guest shares.
A Samba user is considered non-existent when either the UNIX-user with the same name does not exist or no Samba password has been set for the user (smbpasswd -a).
map to guest = Bad User works when either of those conditions are true.
SMB Authentication Flow
Since you made it this far into the article I reckon you want to know what’s going on under the hood exactly. In order to make sense of the information that is scattered in the man pages, I created a simple activity diagram to view the problem at hand out of a specific perspective. The diagram aims to walk you through the authentication flow for authenticated and guest access on a Samba share. Each note is numbered and explained below the diagram.

Control flows for enumerating SMB shares from Windows
Note 0: The Windows user peter browses the local network via the Windows explorer and opens the SMB host.
Note 1: If no credentials are saved, Windows sends the default credentials (Windows username + NTLMv2 hash) to the Samba server. Otherwise Windows sends the previously saved username/password combination to authenticate.
Note 2: Samba uses the user map configuration directive to map the incoming username to a UNIX user on the system.
If no such configuration exists, the username is used as-is (different capitalizations of the name might be tried).
Note 3: Samba checks if both conditions are met:
The mapped user must be a valid UNIX user and the user must be registered as a Samba user (have a password via smbpasswd).
Note 4: The user provided a valid username and password and is able to access the list of shares according to their privileges.
Note 5: Windows displays the “Incorrect username/password” prompt.
Note 6: The user provided an invalid username (either implicitly or explicitly).
If the map to guest configuration is set to Bad User samba maps the user to the guest account, giving the user the respective privileges.
Note 7: The user has been mapped to the guest account and is sent a list of publically browsable shares.
Linux Clients
This is the year of Linux desktop! Not so much when it comes to (graphical) Linux SMB clients though. In an upcoming post I will address the state of the Linux desktop SMB clients (coming soon ™). But in short: The Gnome Virtual File System (GVfs/gio) does not support WS-Discovery, the login dialogs are clunky and do not provide good feedback and SMB1 seems to be the only version working out of the box. So just your typical Gnome project 🙃.
I have not yet looked into KDE-based solutions, but I shy away from pulling in their ecosystem dependencies. Let me know if you have experience with that.
Windows 10 Tools and Configuration
There are Windows settings and tools you should be aware of when testing SMB access. As I am not a Windows user, you might be well aware of those settings and tools, for me though those tools were something new.
Event Viewer
The first and most important tool is the Windows “Event Viewer” which allows you to see logs of many Windows services like SMB. After opening the Event Viewer and navigating to Applications and Service Logs > Microsoft > Windows > SMBClient it should look something like this:
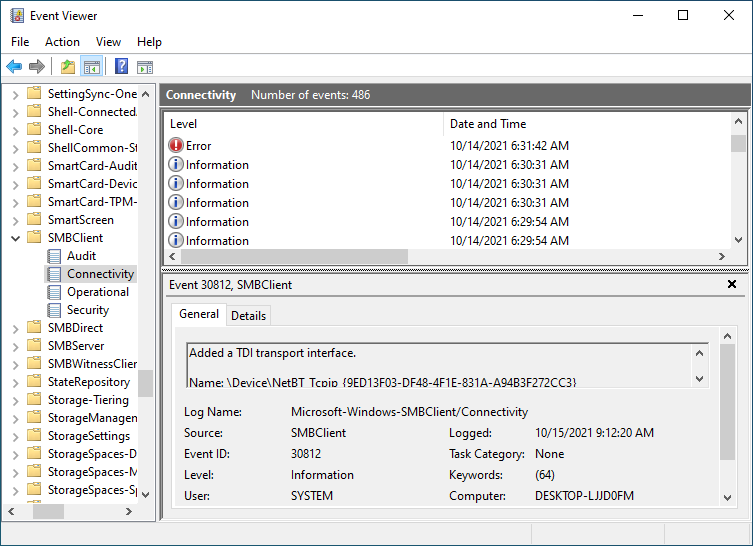
Watch for log entries created by the Windows SMBClient
Disable SMB1
As already discussed, SMB1 should be disabled nowadays1. To prevent NetBIOS interfering with our WS-Discovery testing, make sure SMB1 is disabled in the Turn Windows features on or off dialog:
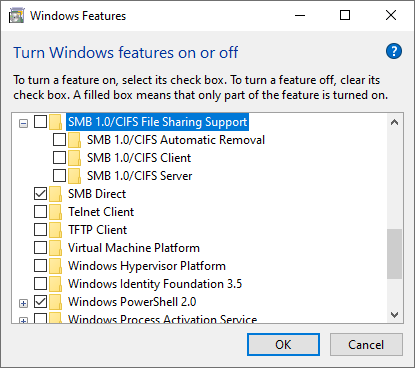
Uncheck the SMB 1.0 Support checkbox in the Windows Features dialog
Guest Logon
Remember the map to guest functionality of the Samba service? Windows 10 Enterprise and some other editions rightfully disable that functionality since in enterprise environments strong authentication is desirable. Windows 10 Professional should not require this change, but it does not hurt to check. They require you to input a username and password for each network share (which usually is configured by the administrator). However in (somewhat) trusted private networks public/guest shares are an easy way of quickly sharing files without exchanging credentials. If you want to use guest access, make sure the group policy Computer Configuration > Administrative Templates > Network > Lanman Workstation > Enable insecure guest logons is enabled:
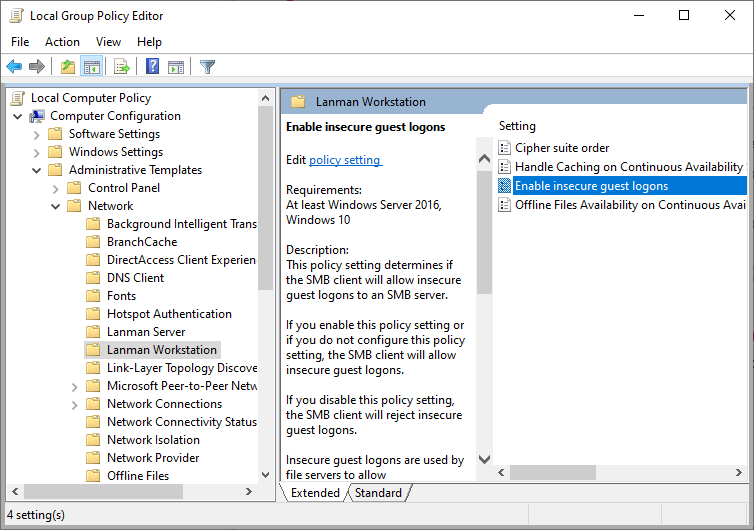
Enable insecure guest logons in the Windows Group Policy Editor
Be aware that by enabling this option you lose the ability to use encryption since that requires a strong authentication3.
Network Profile
In public networks Windows turns of certain services to decrease the attack surface. In a home network, you will want to set your network type to “Private”, otherwise features like pinging the host might not work. Select the “Private” option in the Network Status > Properties panel:
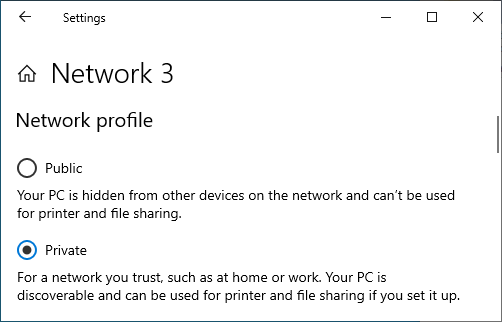
Ensure your network type is set to ‘Private’
Additionally check that the private network settings (Manage advanced sharing settings) allow network discovery and printer sharing:
Ensure ‘network discovery’ and ‘file and printer sharing’ are turned on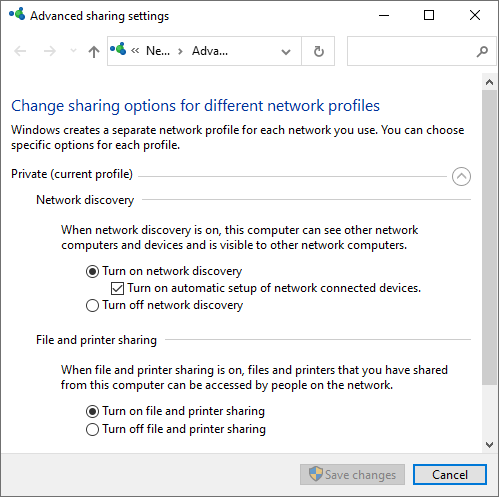
Saved Login Credentials
Since Windows does not show logs explicitly when logging into SMB hosts, it is unclear if default or saved credentials are used. It can’t hurt to check whether Windows saved some unwanted credentials in the ‘Credential Manager’. For example, when Windows stores credentials for a user that does not exist anymore, it could log you in as a guest without you noticing.
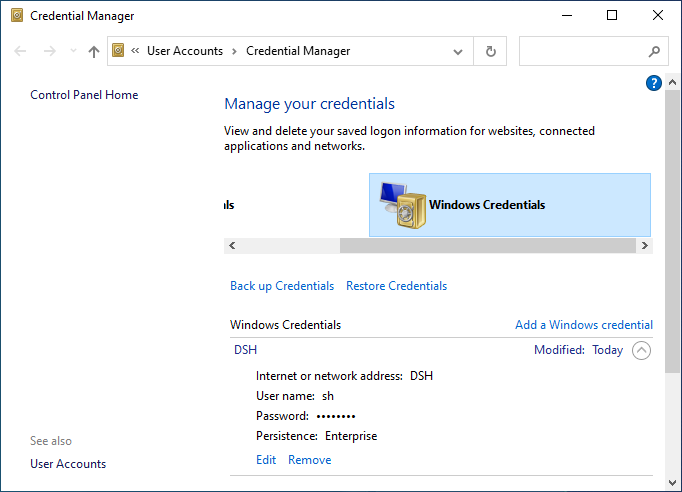
Remove credentials to get prompted again.
Notes for Testing
Disconnect all network shares and forget cached (non-saved) credentials.
net use * /delete